

Nanmac Logo
ISO 9001:2015/AS 9100 D
ISO/IEC 17025:2017 (CALIBRATION)
PJLA CALIBRATION
(SDVOSB) Service Disabled Vet Owned Small Business

Contact Us

MADE IN USA
About Us
Services
Products
Industries Served
logo

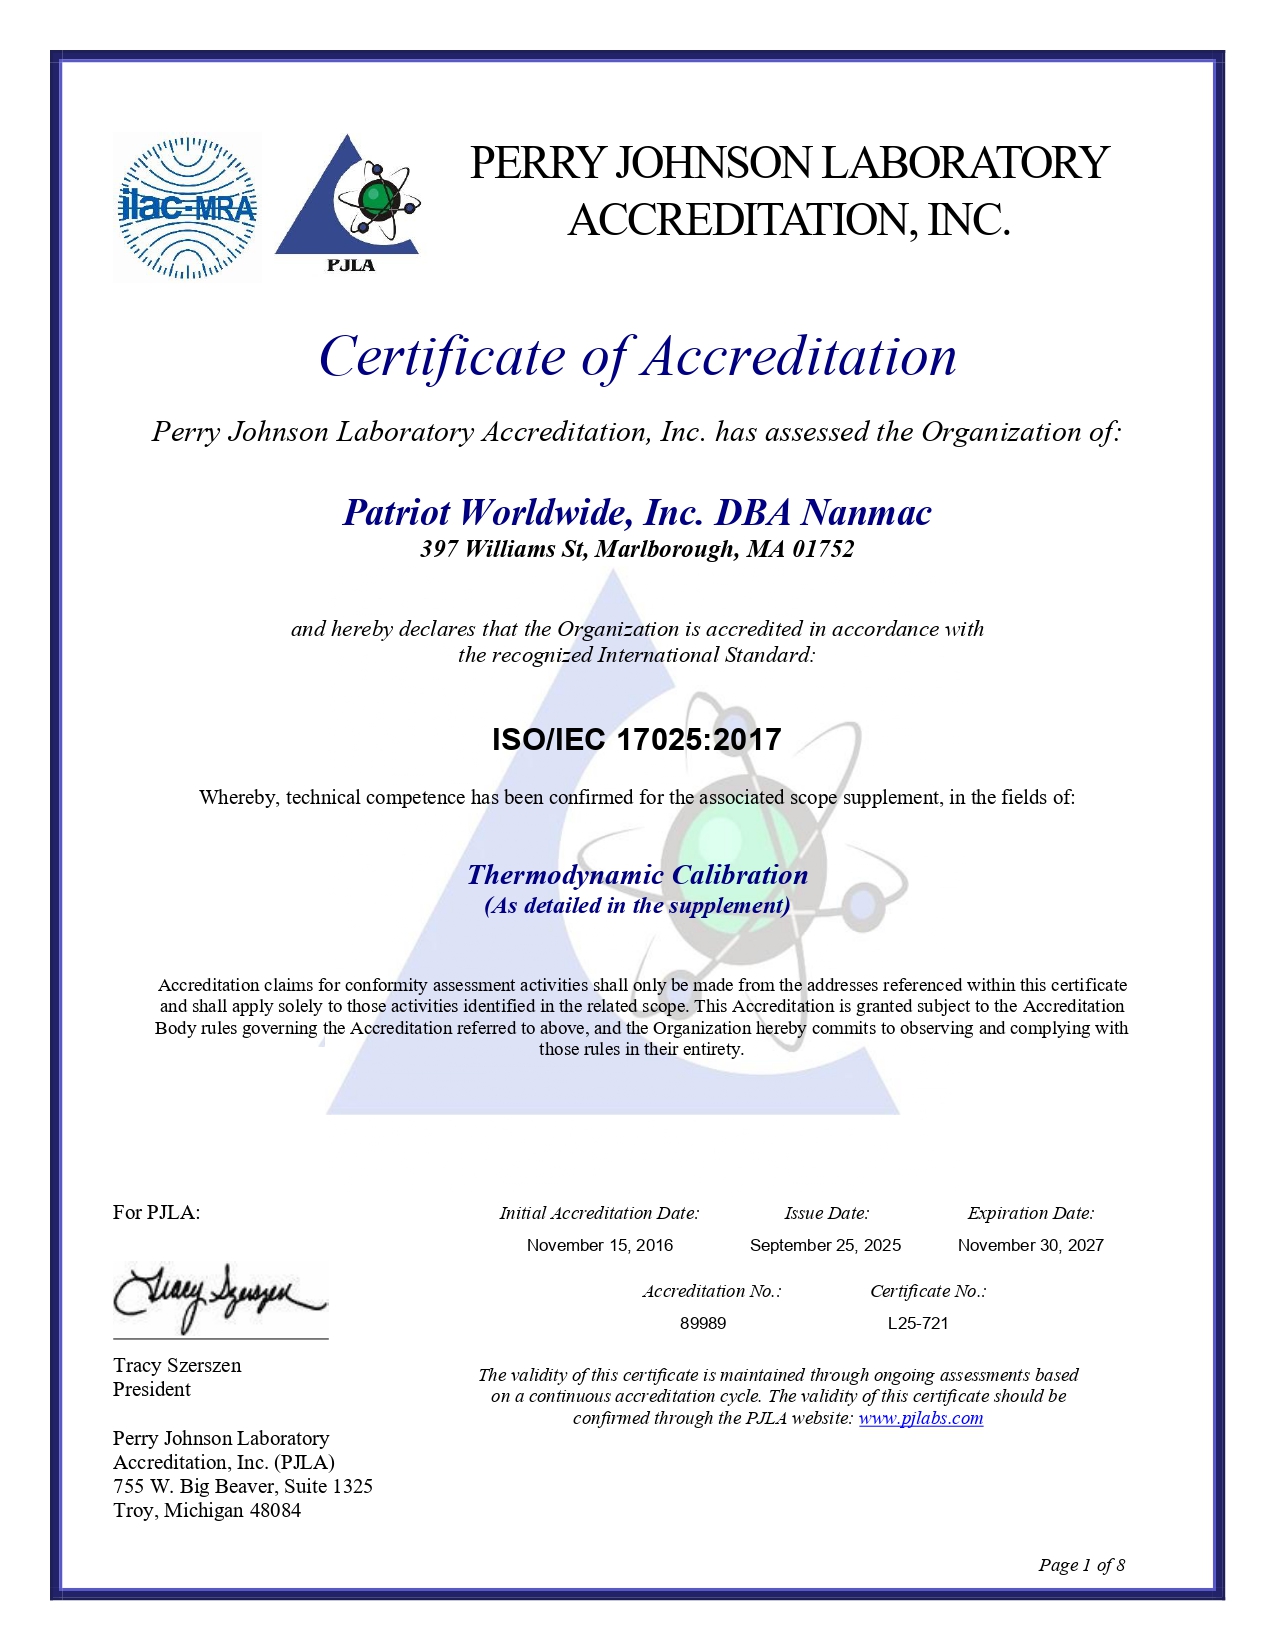
PERRY JOHNSON LABORATORY ACCREDITATION, INC.

Certificate of Accreditation

Perry Johnson Laboratory Accreditation, Inc. has assessed the Laboratory of:

Nanmac Corp.

425 Fortune Blvd #206, Milford MA 01757

(Hereinafter called the Organization) and hereby declares that Organization is accredited in accordance with the recognized International Standard:

ISO/IEC 17025:2017

This accreditation demonstrates technical competence for a defined scope and the operation of a laboratory quality management system (as outlined by the joint ISO-ILAC-IAF Communiqué dated April 2017):

Calibration of Thermocouples and RTD sensors

(As detailed in the supplement)

Accreditation claims for such testing and/or calibration services shall only be made from addresses referenced within this certificate. This Accreditation is granted subject to the system rules governing the Accreditation referred to above, and the Organization hereby covenants with the Accreditation body’s duty to observe and comply with the said rules.

For PJLA:

logo

Tracy Szerszen

President

Perry Johnson Laboratory Accreditation, Inc. (PJLA)
755 W. Big Beaver, Suite 1325
Troy, Michigan 48084

Initial Accreditation Date:

November 15, 2016

Issue Date:

May 19, 2023

Expiration Date:

July 31, 2025

Revision Date

October 28, 2023

Accreditation No.:

89989

Certificate No.:

L23-396-R1

The validity of this certificate is maintained through ongoing assessments based on a continuous accreditation cycle. The validity of this certificate should be confirmed through the PJLA website: www.pjlabs.com

logo

Certificate of Accreditation: Supplement

Nanmac Corp.

425 Fortune Blvd #206 Milford, MA 01757
Contact Name: Hugh Stinson Phone: 508-872-4811

Accreditation is granted to the facility to perform the following calibrations:

Thermodynamic

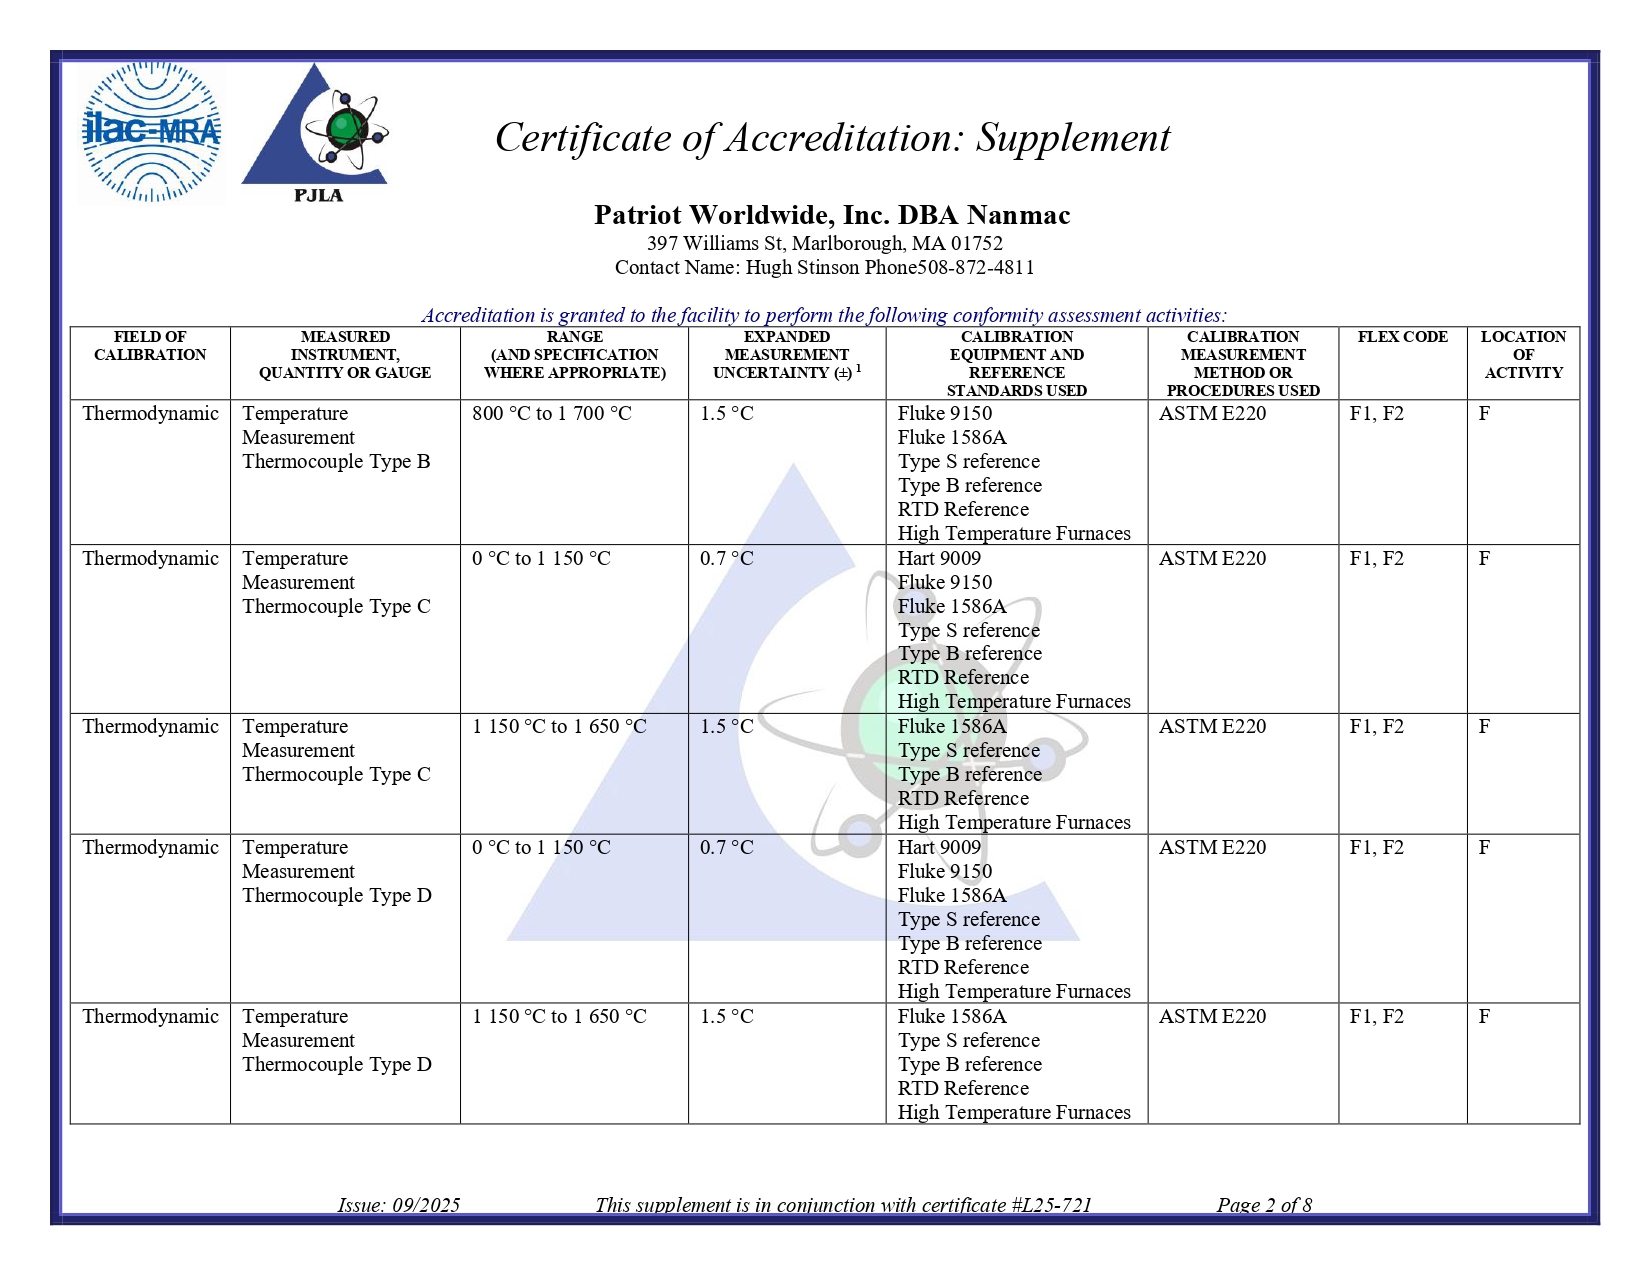
MEASURED INSTRUMENT, QUANTITY OR GAUGERANGE OR NOMINAL DEVICE SIZE AS APPROPRIATECALIBRATION AND MEASUREMENT CAPABILITY EXPRESSED AS AN UNCERTAINTY (±)CALIBRATION EQUIPMENT AND REFERENCE STANDARDS USED
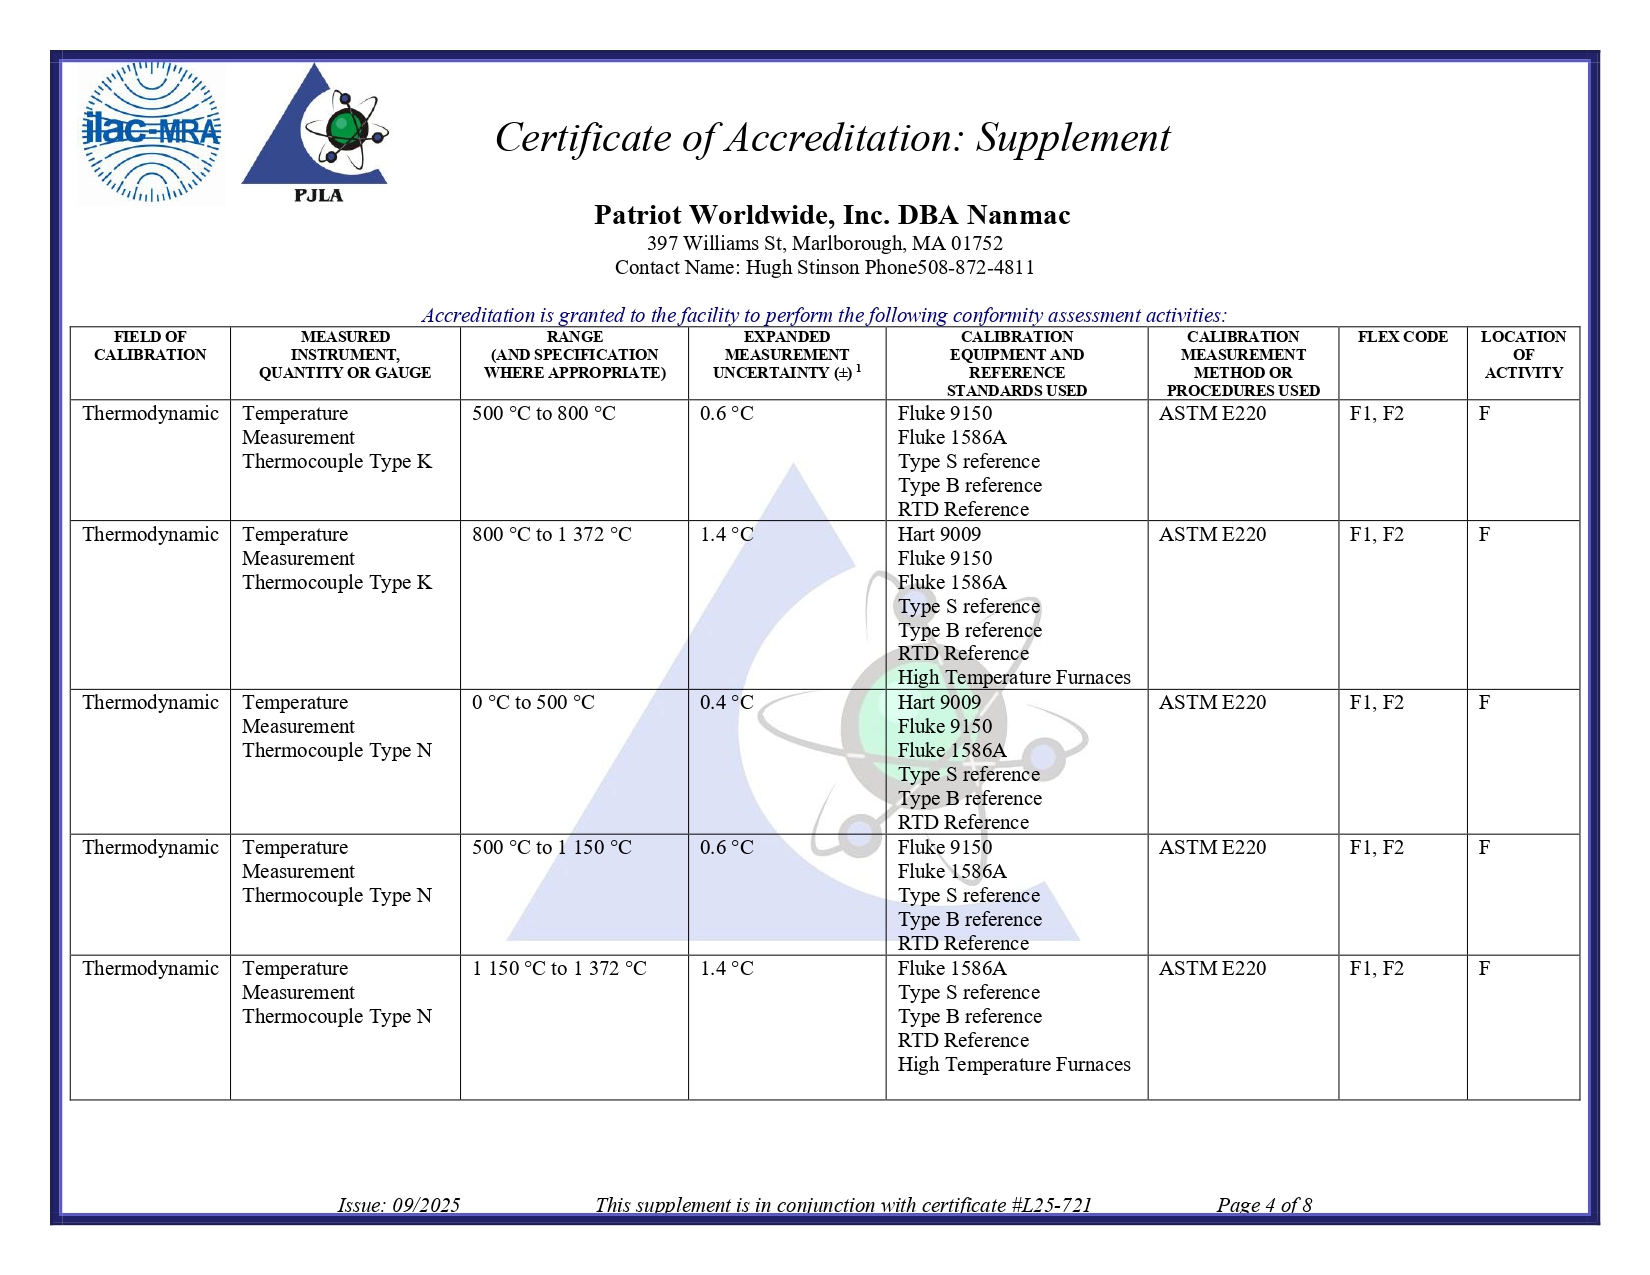
Temperature Measurement Thermocouple Type BF800 °C to 1700 °C1.5 °C
Temperature Measurement Thermocouple Type CF
0 °C to 1150 °C
1150 °C to 1650 °C
0.7 °C
1.5 °C
Temperature Measurement Thermocouple Type DF
0 °C to 1150 °C
1150 °C to 1650 °C
0.7 °C
1.5 °C
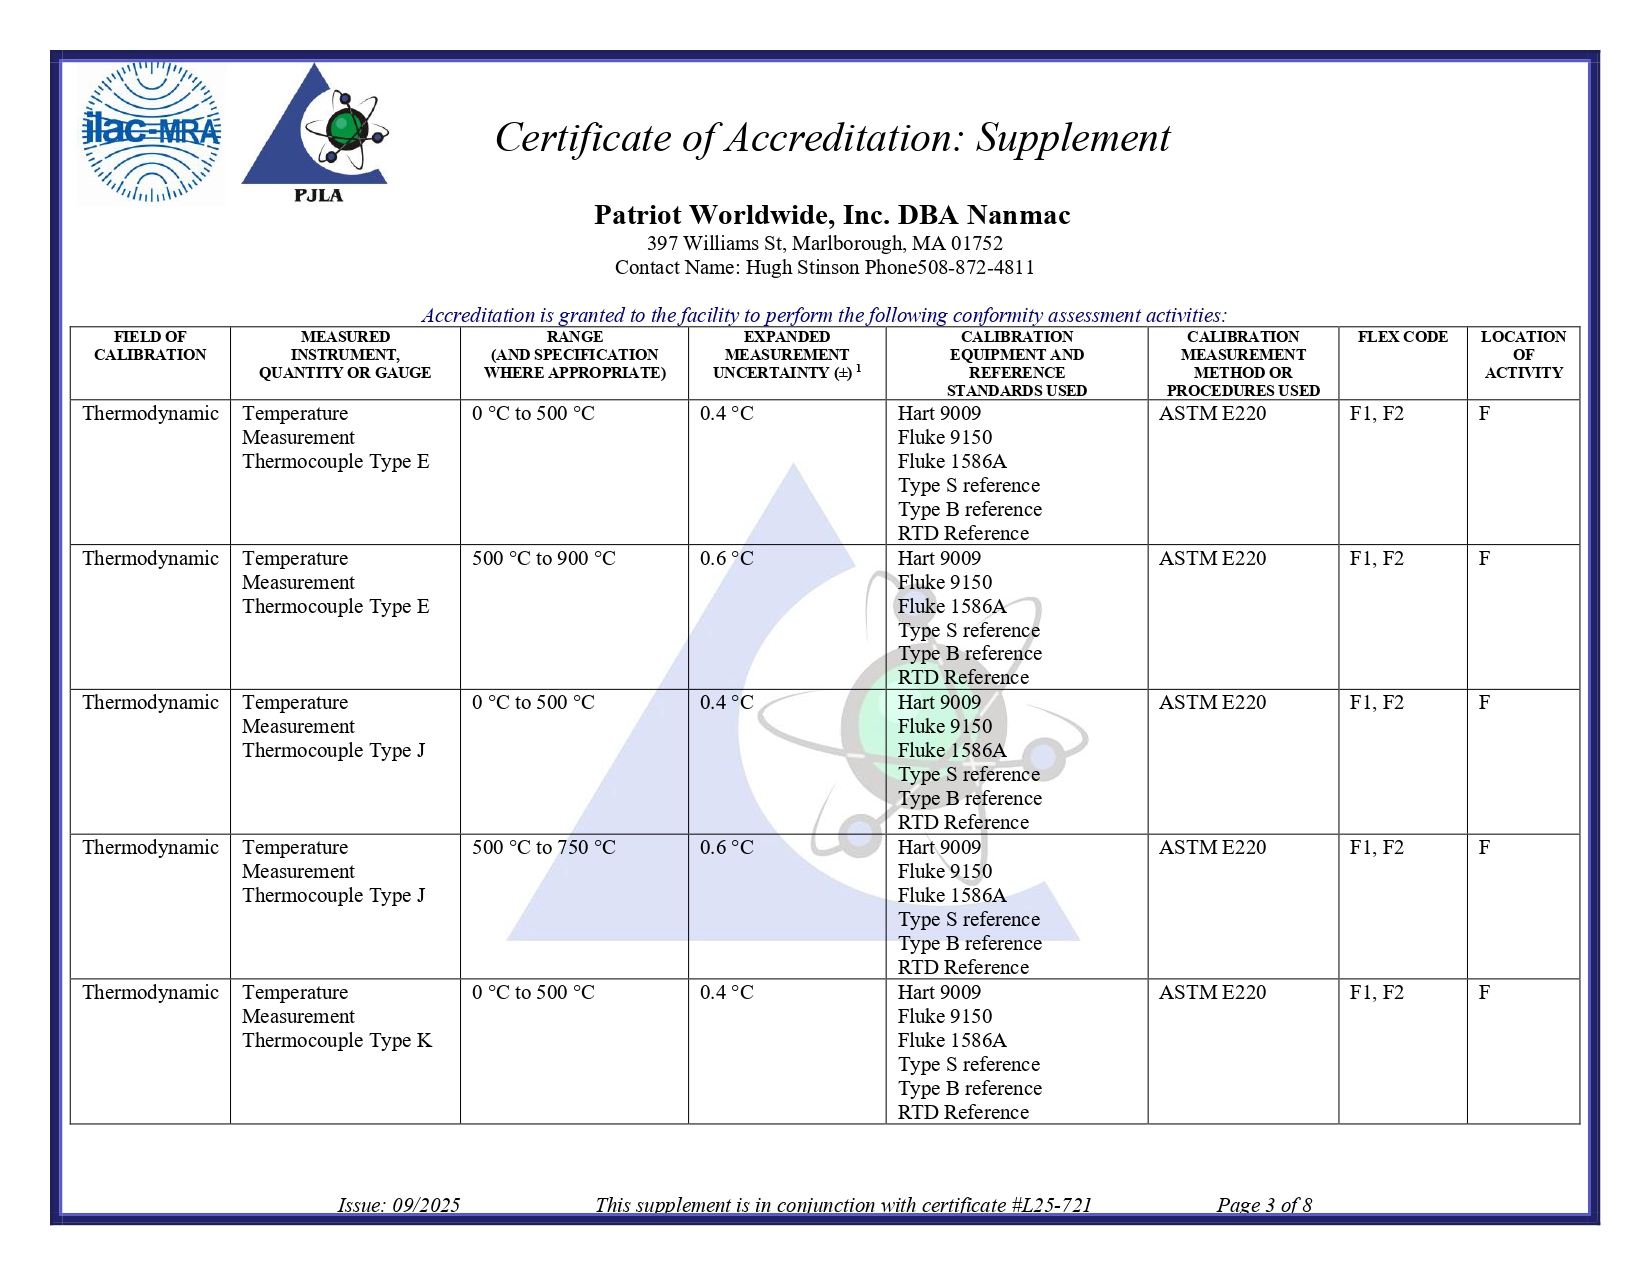
Temperature Measurement Thermocouple Type EF
0 °C to 500 °C
500 °C to 900 °C
0.4 °C
0.6 °C
Temperature Measurement Thermocouple Type JF
0 °C to 500 °C
500 °C to 750 °C
0.4 °C
0.6 °C
Temperature Measurement Thermocouple Type KF
0 °C to 500 °C
500 °C to 800 °C
800 °C to 1372 °C
0.4 °C
0.6 °C
1.4 °C
Temperature Measurement Thermocouple Type NF
0 °C to 500 °C
500 °C to 1150 °C
1150 °C to 1372 °C
0.4 °C
0.6 °C
1.4 °C
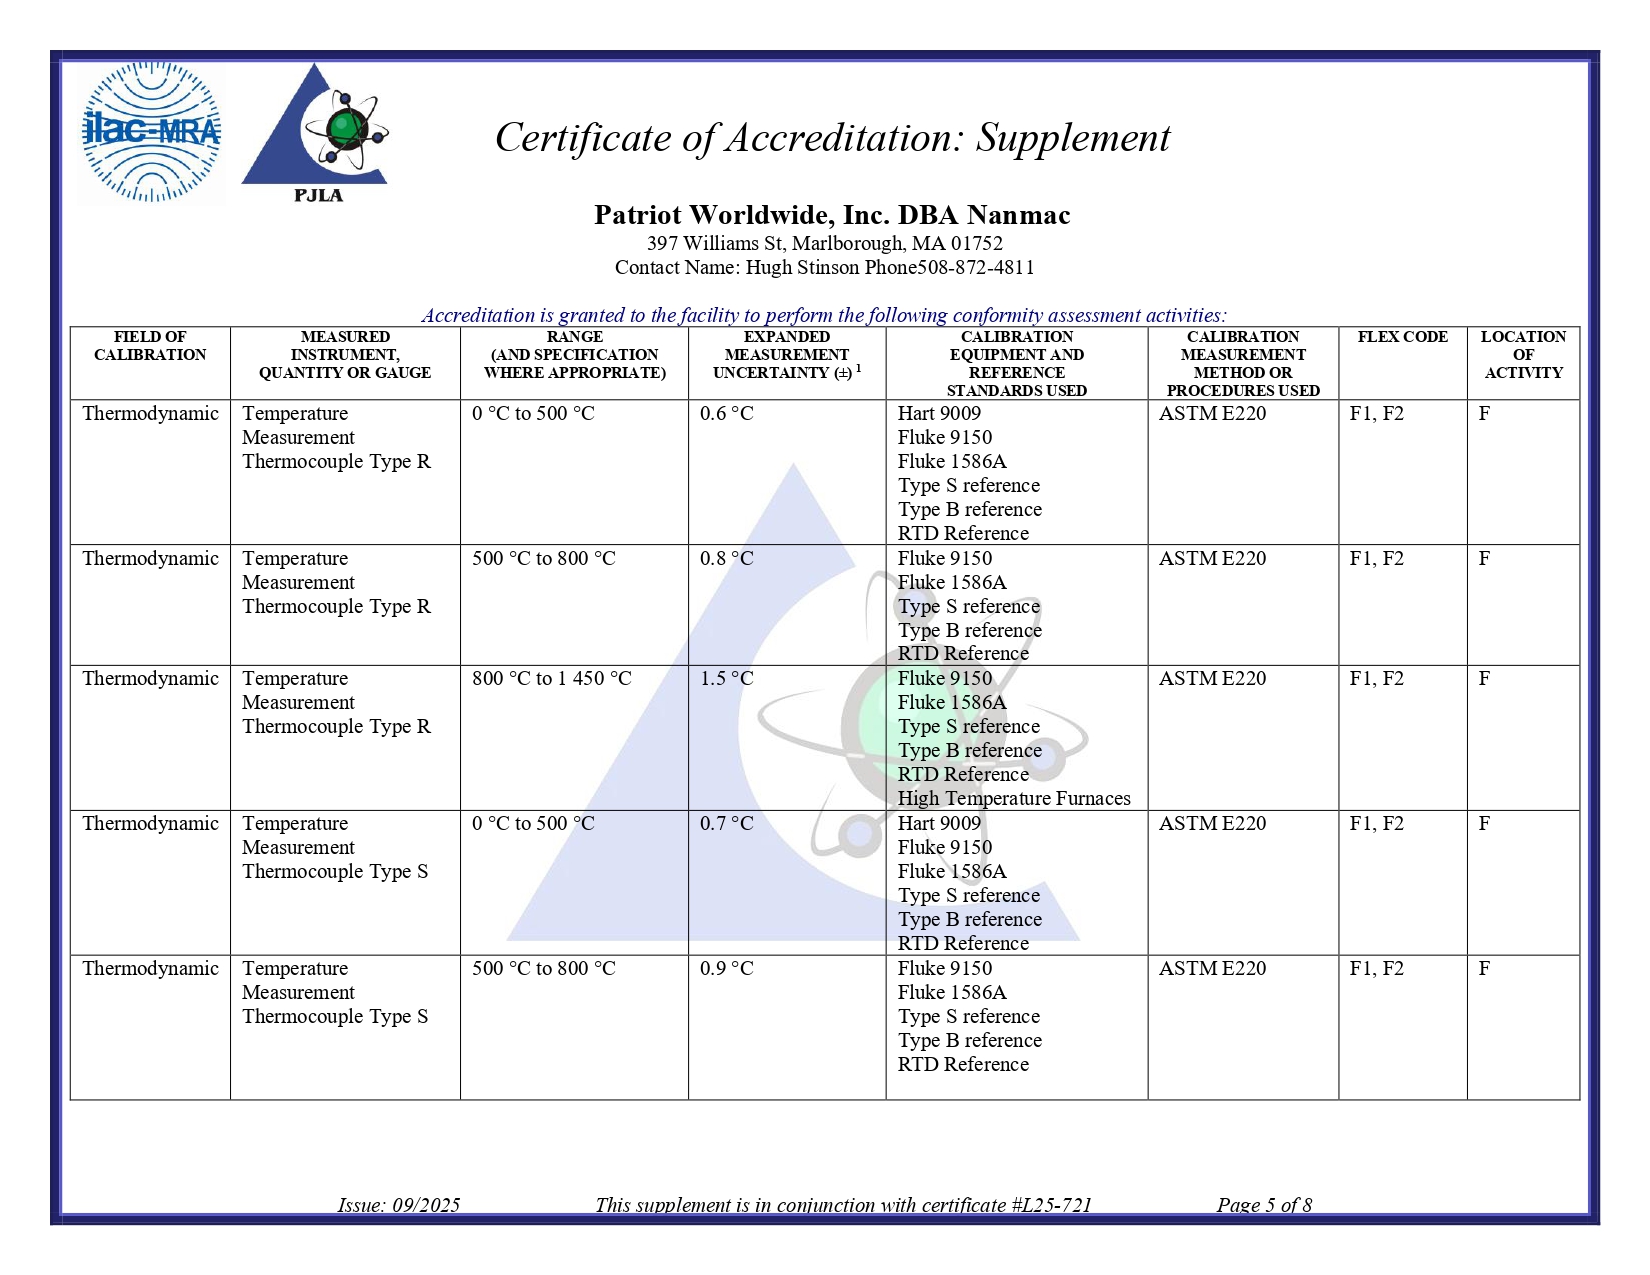
Temperature Measurement Thermocouple Type RF
0 °C to 500 °C
500 °C to 800 °C
800 °C to 1450 °C
0.6 °C
0.8 °C
1.5 °C
Temperature Measurement Thermocouple Type SF
0 °C to 500 °C
500 °C to 800 °C
800 °C to 1450 °C
0.7 °C
0.9 °C
1.5 °C
Temperature Measurement Thermocouple Type TF0 °C to 400 °C0.4 °C
Hart 9009
Fluke 9150
Fluke 1586A
Type S reference
Type B reference
RTD Reference
High Temperature
Furnance
ASTM E220
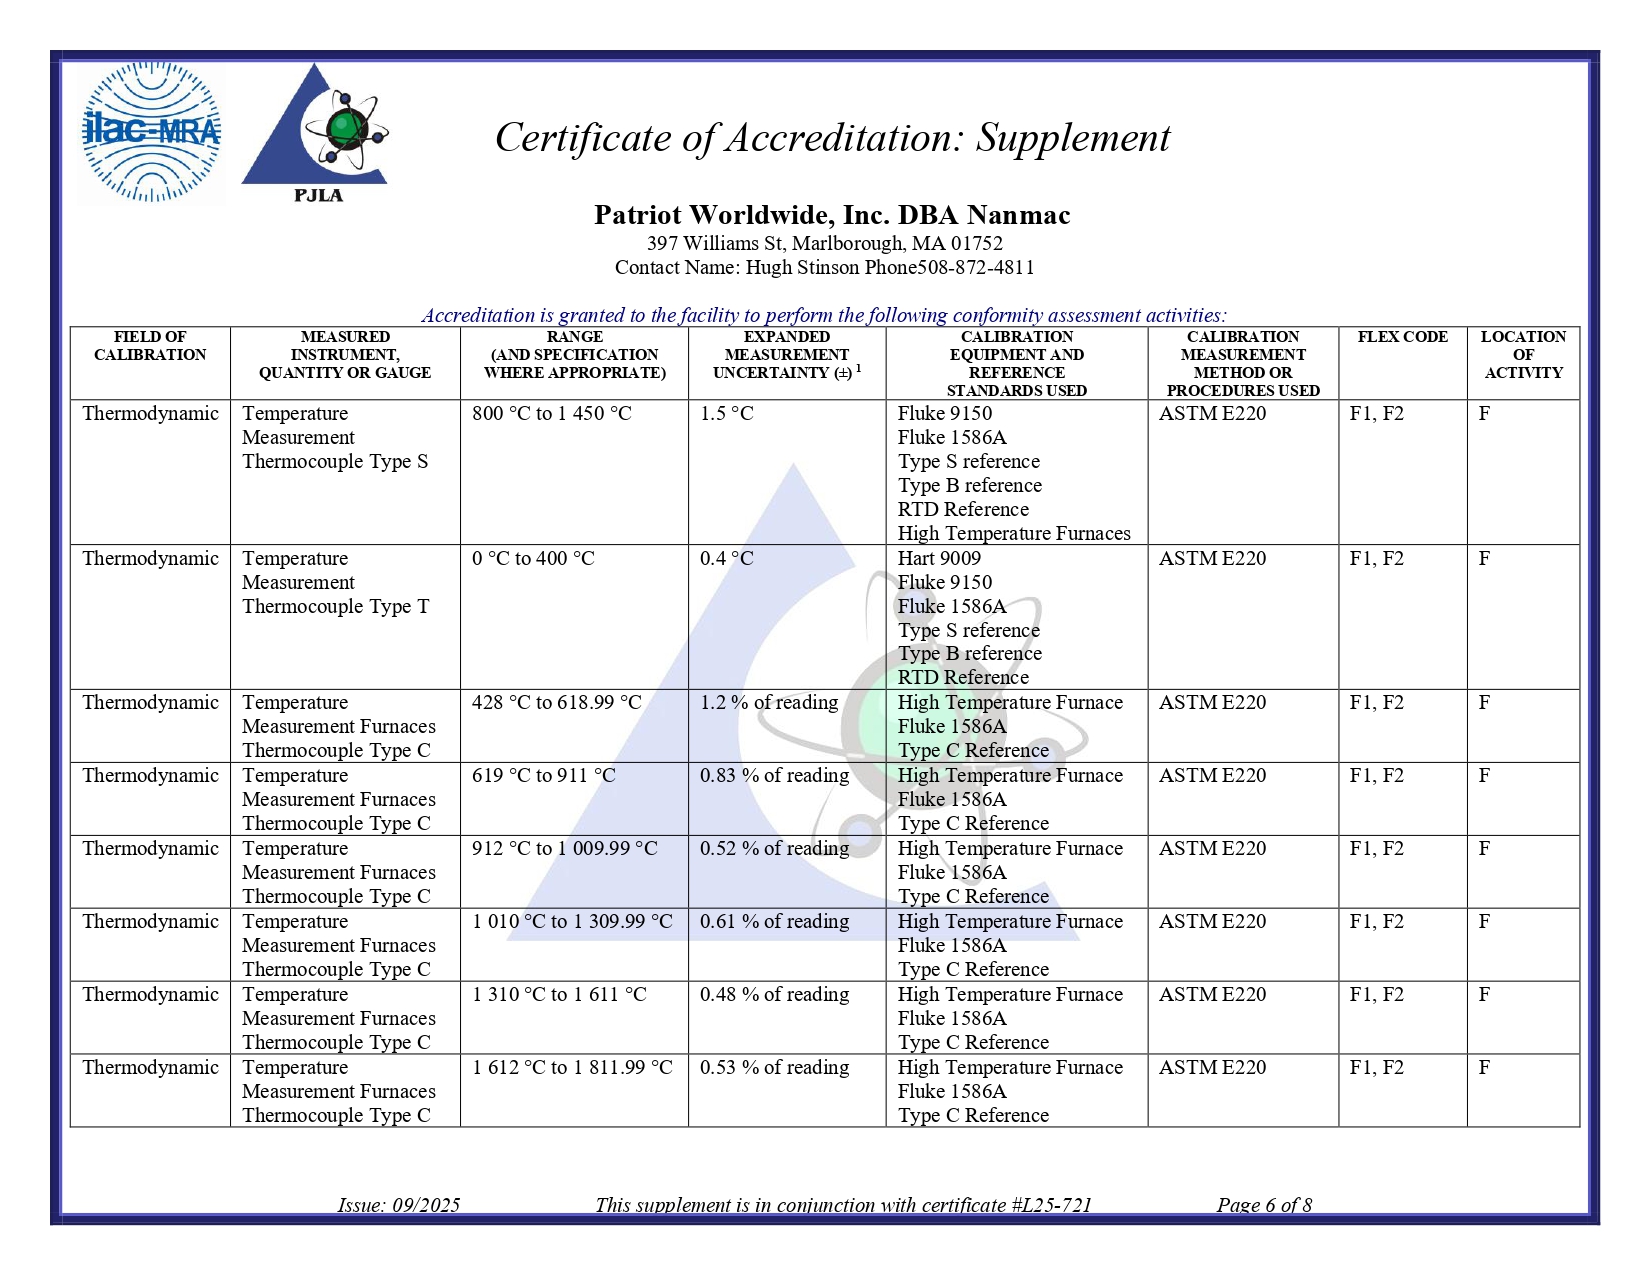
Temperature Measurement Furnaces Thermocouple Type CF
428 °C to 618.99 °C
619 °C to 911 °C
912 °C to 1009.99 °C
1010 °C to 1309.99 °C
1310 °C to 1611 °C
1612 °C to 1811.99 °C
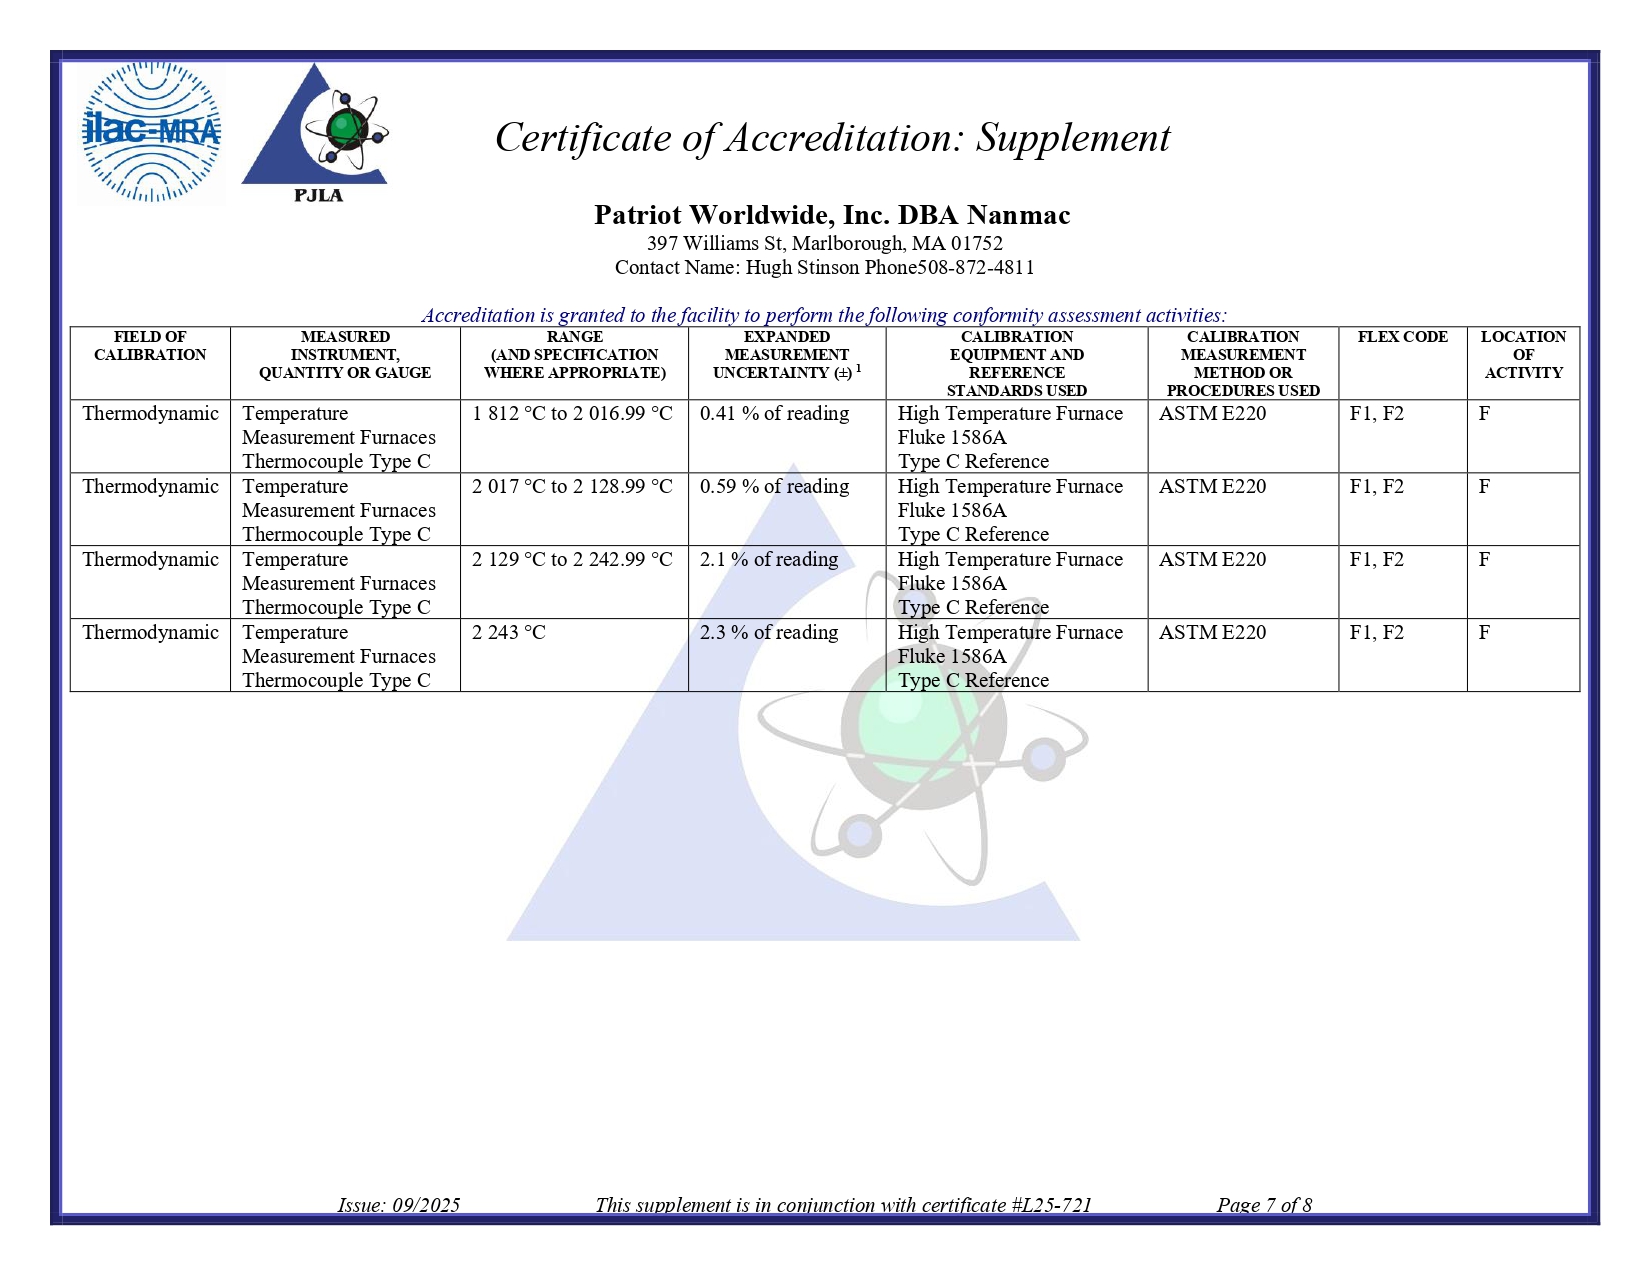
1812 °C to 2016.99 °C
2017°C to 2128.99 °C
2129 °C to 2242.99 °C
2243 °C
1.2 % of reading
0.83 % of reading
0.52 % of reading
0.61 % of reading
0.48 % of reading
0.53 % of reading
0.41 % of reading
0.59 % of reading
2.1 % of reading
2.3 % of reading
High Temperature
Furnance
Fluke 1586A
Type C reference
ASTM E220
RTD SensorsF
0 °C to 300 °C
300 °C to 600 °C
0.37 °C
0.94 °C
Hart 9009
Fluke 9150
RTD Reference
Fluke 1586A
High Temperature
Furnance
ASTM E220
  • 1. The CMC (Calibration and Measurement Capability) stated for calibrations included on this scope of accreditation represents the smallest measurement uncertainty attainable by the laboratory when performing a more or less routine calibration of a nearly ideal device under nearly ideal conditions. It is typically expressed at a confidence level of 95 % using a coverage factor k (usually equal to 2). The actual measurement uncertainty associated with a specific calibration performed by the laboratory will typically be larger than the CMC for the same calibration since capability and performance of the device being calibrated and the conditions related to the calibration may reasonably be expected to deviate from ideal to some degree.
  • 2. The laboratories range of calibration capability for all disciplines for which they are accredited is the interval from the smallest calibrated standard to the largest calibrated standard used in performing the calibration. The low end of this range must be an attainable value for which the laboratory has or has access to the standard referenced. Verification of an indicated value of zero in the absence of a standard is common practice in the procedure for many calibrations but by its definition it does not constitute calibration of zero capacity.
  • 3. The presence of a superscript F means that the laboratory performs calibration of the indicated parameter at its fixed location. Example: Outside Micrometer F would mean that the laboratory performs this calibration at its fixed location.

Issue 05/2023

This supplement is in conjunction with certificate #L23-396-R1

ContactIndustries ServedTechnical ResourcesServicesTerms & Conditions

© 2024 Nanmac Corporation

Follow us onNanmac LinkedIn Page Link